Monday, 31 July 2017

Takom Leopard C2

As I noted a few days ago Takom made a bit of a mess of the front part of the turret where the gun mantlet joins. Looking at reference pictures and a turret from the Meng Leopard 1A5 I decided the best thing to do was remove the shaded area;

Actually I removed more material than that as the cut was made where the bottom of the turret joins the front. This of course left a big gap to fill and after studying the Meng turret I made an 'L' shaped piece using 0.30" styrene strip;


By this time I cut off the mantlet as it was just getting in the way. Once the 'L' piece had been glued into place I then used Milliput to form a curved shape underneath like the Meng turret, shaping it by using my finger and water;

When the Milliput has cured I will give it a sand as there are two corners of plastic card still sticking out and these will be blended into the lower turret sides.
It looks a bit daunting to do this but I believe it will look much better in the end.

Friday, 28 July 2017

Takom Leopard C2

Attention has now turned to the turret with some tweaks to improve it and I've also discovered a problem. Firstly the most obvious improvement is to add springs to the loaders hatch by cutting away the kit ones;
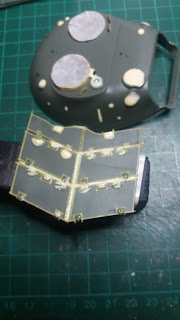
The add-on armour on the gun mantlet features four oval holes so these were drilled to a round shape and hexagonal bolt heads were added using a punch and die set, also the rectangular plate on the left in the picture was supplied as an etched item but looking at reference pictures this is quite a thick plate so it was substituted for sheet plastic;
After fitting the mantlet and canvas cover there was a huge gap underneath and checking that I hadn't left anything off and again checking reference pictures it's apparent that Takom have messed up here;

The mantlet should actually fit OVER the bottom bit of the turret and not flush so it looks like the turret is too short. One solution is to just fill it all in and hope nobody looks too closely OR what I'm thinking of doing is removing the lower lip and rebuilding it;
As mentioned above the bottom lip should fit inside the mantlet but seeing that I've already glued bits into place it should be an interesting exercise to carry out this job without destroying anything.
And it was all going so well too........anyway here's the turret so far;
One thing I should have done is to actually check what needed gluing to the turret before spraying it with Rustoleum Terra Cotta as I had to scrape away the paint to be able to glue things to it. Apart from the hitch with the turret it shouldn't be long until I finish building this. YAY for me! :o)

Sunday, 23 July 2017

Takom Leopard C2

Due to the design of the kit the side skirts need to be added before painting as the front fenders need to look like one piece. You have two options here, the first option is to leave the drive sprockets and front idlers on the hull as with the side skirts fixed you won't be able to remove them for painting. The second option is to just cut 1.5mm off the front axles and you'll be able to add the idlers afterward although the sprockets will still need leaving in place unless the example you are modelling has sections of the side skirts missing at the rear (which is the case for my model luckily).
The other problem is that the drive sprockets stick out just enough (which may be due to the fact I used replacement exhausts) to stop the skirts fitting properly at the rear.To counter this I removed some material from inside the sprocket and the mount for it on the hull;


The side skirts were fixed into place and left to set but the day after I noticed from the reference pictures on Prime Portal that there are a set of four catches either side and these were in a variety of positions rather than just horizontally as moulded on the kit parts;
If I had spotted this earlier it would have been easier to replace them before I glued the skirts on, anyway I removed them and cleaned up the areas. New ones were made from styrene strip with the ends rounded off and a small piece of rod glued near to one end then fixed to the skirts;


Looking much better! I separated the front right fender to add some damage but had to glue it again as the joint between that and the side skirt failed so at the time of writing it is taped up and being left to set.

Saturday, 22 July 2017

Takom Leopard C2

I'm up to the stage of every armour modellers favourite bit and that is the tracks. The tracks in this kit are individual links joined together with end connectors and feature separate guide horns.
When you look in the box it all seems rather daunting however the most time consuming part is cutting off the links and guide horns from the sprues and then cleaning them up, the actual assembly is very easy.
When removing the links from the sprues you need to take care as they are easily broken, luckily there are plenty of spare links included. Also Takom fail to mention it in the instructions but you will need 82 links each side.
After removing the links and guide horns from the sprue and cleaning them up I clipped one guide horn into each link then clipped around 10 or more links together. With the end connectors still attached to the sprue these were pushed onto the ends of the links then cut off from the sprue using a new scalpel blade. These sections were joined together until I had 82 links then fitted the tracks to the hull;


Very very easy! The beauty of this is that I can keep the tracks separate for painting and I can glue the side skirts on now rather than after as the surface area for sticking the skirts to is very small.
One thing to mention about the tracks and that is at the weathering stage do NOT use any spirit-based washes on them as it will attack the vinyl end connectors and the tracks will fall apart, I know this from my M728 build a few years ago so I use IPA for applying pigments, washes etc these days.

Wednesday, 19 July 2017

Takom Leopard C2

The past two days I've managed to stick some more bits on and improved a couple of parts. Starting with the rear hull the tow hooks were scribed as per the front ones I did a few days ago, the mountings for the barrel clamp were replaced as I managed to lose one of them when it pinged into oblivion from the tweezers, also the two mountings moulded on the hull to the right of the barrel clamp were cut off and had holes drilled into them before being glued back into place. The tool box on the left had the chunky looking rail on the top cut away and replaced with a length of stretched sprue.
 The biggest single improvement you can make is to thin out the rear light surrounds as they are quite thick as shown in this picture;
The one on the right after I attacked it with a scalpel.
Moving onto the hull sides and there are indents moulded into the plastic to aid with placement of the on-vehicle equipment and on the left side they work quite well but on the other side I decided to fill them all as there were some serious gaps where the tools fitted. The tools had the clamps replaced where necessary with fuse wire.

Although it doesn't say in the instructions, the two photo etch parts supplied for the top of the hull need the top edges folding;
Finally for this post there is a duct that runs from the top of the drivers vision blocks to just above the front right fender. This is supplied in the kit as a solid block however on the real vehicle it is hollow so I drilled out either ends then shaped them with a scalpel;
I also added a couple of brackets from scrap PE sheet.
I don't have much left to do with the hull apart from the tracks and figuring how to mount the side skirts so the turret will be next.

Friday, 14 July 2017

Takom Leopard C2

Looking at the road wheels on the actual vehicle from the Prime Portal site they show some signs of wear and tear so I've tried to replicate this on the kit wheels;
I've also been trying to do the weld seams around the vehicle as some look pretty evenly done especially on the rear exhausts. To do this I rolled Milliput into thin lengths and pressed it into the joints then used a modelling knife to make the indents, Hopefully they will look good under paint;

The top weld seams on the exhausts were done by masking off the areas, leaving thin strips between the lengths of tape. Mr Surfacer 1000 was then applied to the exposed areas and when it had cured slightly a knife was used to texture it. When dry the tape was then removed.
The periscopes in this kit are completely featureless, you could hack them out and replace them with aftermarket ones OR improve them. I do this by heat stretching some sprue into fine lengths then gluing them around the edges of the periscope face, cutting off any excess when set;

A fairly simple fix but it does improve the basic kit items. This will also be done to the turret ones later. Another simple improvement concerns the towing hooks as they are moulded as one piece whereas on the real vehicle they are of course two separate items. All I did for the kit items is to engrave them using a dress makers pin then run liquid glue around the parts to clean them up;
One thing to watch in the Takom kit is the NBC filter on the left side of the vehicle as you need to add the two square holes at the rear of the block;
I've added some heat-stretched sprue around it as well as the lifting lugs and the block on the front near the drivers position as I need to add the weld beads later.


Monday, 10 July 2017

Takom Leopard C2

A few updates today as I managed to get quite a bit done before I return to work. The anti-slip texture has been applied to the turret, turret stowage hatches and front fenders and for a first attempt at this I'm quite happy with the result;
Moving onto the hull an easy improvement can be made to the suspension swing arms as there is no detail on the front of them. This involved drilling a 0.80mm pilot hole in the centre to a depth of about 2-3mm, this was enlarged then using a dentists burr the hole was flattened out at the bottom. A short length of 0.75mm styrene rod was then inserted and cut to length, this was then glued into the hole. Doing this makes the featureless kit part look much better and it's an easy fix;

After seeing a Leopard up close I realized just how shallow the rear exhaust grills are on all the kits I have and ordered the welded Leopard Club resin replacements for the C2 (available here; Leopard club welded exhausts) and the cast ones for the Meng 1A5.
If you do buy these then you need to chop the rear deck before you glue the top and bottom hull parts together. For the Takom kit measure 2mm from the engine grill panel lines and draw a line, then measure 40mm from the top of the side hull, mark it then draw a vertical line down from that. Using a razor saw and feeling brave you then cut out the area that I've shown in the photo;

I chamfered the edges of the kit parts, cleaned them up and the fit of the resin replacements was almost perfect, all they will require is some filling to blend them in afterwards. I must say they look a hell of a lot better;


 All the road wheels, idlers and drive sprockets have been cleaned up and glued together, the only other big job will be the track assembly but that will be a separate post. One thing I need to do is put some wear and tear on the tyres as the photos from the Prime Portal website show a fair amount of abuse to them.
So far I'm liking this kit. Some of the details have been simplified particularly the suspension as it's moulded onto the hull whereas these were separate parts on the Revell kit I built in 2016 but generally it's pretty good AND my first ever Takom kit.


Saturday, 8 July 2017

Takom Leopard C2

After hunting around the net for ideas about anti-slip textures I was pointed in the direction of these products;

Using a Revell Boxer as a test bed I sprayed each side with the colours. The results are pretty good to be fair, the Terra Cotta being a finer texture which is ideal for the turret and tops of the rear stowage basket with the bronze colour a heavier texture.


Looking at the reference pictures on Prime Portal the anti-slip texture on the lids of the rear stowage basket does not go right up to the edge so to attempt to replicate this I cut masking tape into thin strips and just followed the outline around the hatches and hinges. The rest was filled in using masking fluid which also helped with the arc-like areas on one side of the hatches;
This will be sprayed sometime later tonight or tomorrow. I masked the front fenders earlier this afternoon and gave them two coats of the coarser paint;

I'm quite pleased with how these have turned out and they should look good under paint. 

Takom Leopard C2

After visiting Tank Fest at the Tank Museum, Dorset in June of this year I have to admit that I've fallen in love with the Leopard. After seeing three of them charge around the arena I was smitten so obviously once home I started looking at the kits I have in the stash;
One of them is the Takom 1A5/C2 Leopard that can be built as a Canadian vehicle in overall green. I found via Prime Portal (the photo walkaround site) the exact Leopard that Takom include markings for in the kit so it is this one I will depict (or try to).
I ordered a few bits from Leopard Club that I feel are essential, namely the smoke dischargers, mantlet plugs, aerials, RMG tow cables and engine grills.
Having looked at a Leopard close-up for the first time I see what the problem is with all the kits in this area and that is they are all far too shallow in depth. What I am trying to avoid is an etch set as I'm getting too bogged down in builds when using them plus Takom supply some etch in the kit so that will do for me. Another thing I going to live with are the roadwheels as the kit ones are apparently too wide but slightly too small in diameter.
After looking at the parts I noticed that some were quite greasy (presumably mould-release agent) so to avoid the risk of not being able to glue parts together due to the contamination I gave them a wash in warm soapy water;


So while the parts are drying outside in the warm I'm going to work out how to apply the anti-slip texture as it's quite coarse on the front fenders but on the turret and stowage box it's quite fine.
This is the actual vehicle I want to build (photos via Prime Portal);


The rest of the walkaround can be found here;
Prime Portal