Saturday, 25 April 2020

Airfix 1/48 Tiger Moth

I'm amazed! In the space of less than a week I have actually built a kit, even with all the extra detailing included;


The last bit of extra work was to replace the tail skid as the version I'm doing has a tail wheel.
I found a wheel of suitable diameter in the spares box and cleaned off the moulded detail then starting off with a length of 2mm square styrene rod a new fork was shaped;


Once I got the shape as-near-as-dammit to the photograph I was using, a hole was drilled into the back of the fork and the rudder post then copper wire of 0.80mm diameter was used for the shaft and support. Fine fuse wire wrapped around a fine drill bit was used for the spring;


All that needs to be done is to mask off the inside of the cowling, cockpits and windscreens, give it a wipe over with IPA to get rid if any dust and grease and it will be ready for painting.
The scheme I have chosen is a Belgian Air Force machine in overall silver dope so the model will be sprayed with a Tamiya rattle can for the base coat.

Airfix 1/48 Tiger Moth

The struts fit into recesses under the top wing and leave some rather big gaps. Now I know that unless you turn the model upside chances are you won't see them however I know they are there so I filled them.
I generally use a solvent based model putty such as Revell's Plasto but as it bites into the plastic you end up losing a lot of surface detail when sanding the stuff off. With that in mind I used AK's Modelling Putty as for jobs like these you fill the gaps, let it set but instead of sanding you can remove the excess with a cotton wool bud (Q-Tips for any American readers of my blog) soaked with IPA (Iso Propyl Alcohol). Doing it this way preserves any detail;


Much cleaner and quicker than sanding. The putty does have it's limitations but for gaps such as these it's ideal. I'm not one for some of the gimmicks and snake-oil salesmen in the modelling world but this stuff I like.

Airfix 1/48 Tiger Moth

The kit is progressing quite nicely as the fuselage is glued together, the lower wing and tail plane are on and I glued the cowling together as a sub assembly rather than separately which will make painting easier later


As the aircraft I want to do has the anti-spin strakes fitted to the rear fuselage, Airfix supply an alternative tail with them moulded on however some surgery is required to the fuselage. Airfix supply a jig that fits over the rear fuselage with the idea that you sand down the area however I found it easier to score it with a modelling knife and remove the section of fuselage that way.
A word of caution here as you need to tape the jig (DO NOT GLUE IT) to the fuselage otherwise you may end up with an uneven cut that will lead to a lop-sided tail-plane.
Before fitting the tail I lightly scored the elevators and cut the top rudder hinge line so that I could offset them.
Before the lower wing was glued into position I removed the moulded detail ready for the etch replacements then the wing was glued into place with some filler being needed after it had set. The struts were glued to the top wing and left to set and before the two venturi's were glued to the fuselage, holes were drilled either end of them to improve the look.


After looking ahead at the rigging instructions it wasn't clear what the rudder cables attached to on the fuselage sides as Airfix moulded a weird 'L' shaped section so after studying photos of a real Tiger Moth these 'L' sections should actually be a rectangular plate with a slot where the rudder mechanism sticks out.
With that I scraped off the moulded detail and made new plates from thin styrene sheet with a slot engraved using a pin and a straight edge, triangular pieces were cut from the same size styrene sheet for the rudder cable mountings. Remembering that I off-set the rudder, the cable mounts were off-set too then these assemblies were glued to the fuselage sides.


The holes were drilled out for the rigging and although the rigging instructions are pretty good Airfix missed where the elevator cables go through the fuselage. After figuring out as-near-as-dammit where they are I drilled holes into the fuselage through to the other side then added reinforcement patches from 1.5mm thin styrene discs punched out using my RP Toolz punch and die set (a very useful piece of kit) with holes drilled into the centres. These were then glued into place. Hopefully they won't stand out so much after a layer of paint;


At the risk of over thinking this model (like I usually do) I have to say I have really enjoyed it so far as it is has been a really pleasing kit to work on and not become a chore like other recent builds, however this may change when the time comes to fix the top wing in place.

Thursday, 23 April 2020

Airfix 1/48 Tiger Moth

Just for the hell of it I thought I would start this with the sole intention of (except for an Eduard Zoom etch set) building it OOTB. Of course after looking at some cockpit shots I decided to add some extra bits of my own plus as I discovered Eduard will have you place the slat control quadrants on the starboard side in between the cockpit framing. 
These were actually mounted on panels that attached to the framing so these were made from thin styrene sheet (or plastic card in old money) with the linkages added from heat stretched sprue. 
The throttle quadrant detail was scraped off the port side of the cockpit and replaced with the etch parts and again throttle linkages were added with heat stretched sprue. On all four of these linkages the knob was replaced with 0.88mm styrene rod as I felt the etched ones were pretty non descript.
The rear seat was replaced with the Eduard one and it's worth noting that the rear bulkhead doesn't quite fit properly so the outer edge was chamfered until a good fit was obtained.


I added rudder pedals using a mix of styrene rod and heat stretched sprue with foot rests made from the frame the etched parts were attached to.


That was enough detailing for me otherwise I would have got bogged down researching the aircraft and it would have killed the project stone dead. With that I painted the interior black before spraying it with a very much lightened Tamiya cockpit green/grey with seat belts picked out with Vallejo Iraqi Sand and Leather and slat/ throttle quadrants painted with Vallejo aluminium.
When dry the interior received a dark wash which was a  mix of Kleer/ Future, Tamiya semi gloss black and brown, instrument panels were glued into place and the fuselage was glued together.


Monday, 13 April 2020

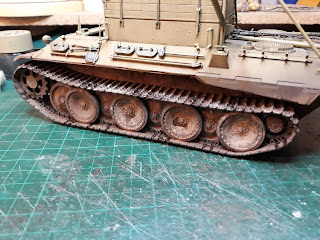
Takom 1/35 Bergepanther

I had some bench time yesterday so I tried to get the model finished as it has been sitting in a box for months. Unfortunately I managed to mess up the weathering and to me the model looks awful so it's going into another box and out of sight.
I may rework it at some point but I'm done with it for the time being. Funny thing is I used the exact same weathering powders on the Miniart T-55 and that was fine, this time around it looks dreadful. Oh well....