Showing posts with label E-75 Eber. Show all posts

Thursday, 10 May 2018

E-75 tank destroyer

I actually primed this last year using matt black from the new AK Real paint but it got pushed to the back of the queue due to losing interest, however after the nightmare with the Airfix P-51 finish I decided to get this one on the bench again just to prove to myself that I can actually spray stuff without it going wrong.
The base coat was again from the AK range using RC061 Dunkelgelb Ausgabe 44 and pretty much straight after spraying that the camo was applied freehand using a Badger 100 and Mr Hobby H405 Olivegrun lightened with Tamiya XF-3 Yellow;


So far so good! The next step is to apply a coat of gloss varnish to get it ready for any decals I might apply and the start of the weathering process.
I also need to spray the exhausts in various shades of brown and orange, coat them with hairspray decanted from the tin and when dry spray them in the basecoat. After this they will be chipped using a hard brush and warm water.
I like the AK Real paints but a couple of things I've learned is not to spray them OVER Tamiya paint thinned with their own thinner or IPA (I found that out with the Mustang), also when thinning the paint do it in a jar rather than the paint cup on the airbrush as I found it difficult to get the paint flowing

Tuesday, 19 December 2017

E-75 tank destroyer

I've been away from the bench for a week or so due to illness but because I'm feeling better I decided to make some progress on the E-75 tank destroyer. Like the E-50 Heimdall I built earlier this year I've decided to add the armour plating over the engine grills that were found on late-war panzers, Then I thought of the Panthers found in Italy that had additional spaced armour welded to the top of the turrets so using paper templates I marked out where it would fit on the roof of the E-75....of course it would have been so much easier if I had thought of it BEFORE sticking everything on the roof but never mind.
I made the templates and transferred the shapes to 0.20 thou styrene sheet then cut them out, .75mm rods cut to 2mm lengths were glued in various places underneath and left to set.
The engine grill plates were just rectangles and circles again cut from .020 thou styrene sheet (or plastic card for the purists out there) however the .75mm rods were inserted into pre-drilled holes, this way it makes painting easier as they will be all added last;


One thing that I didn't feel looked right was the raised detail on top of the gun mantlet so this was removed and Mr Surfacer applied to re-texture it. I'll probably need to put a couple of coats on as when I last looked you could still see the remains of the raised detail;


Another thing I'll be adding (although you'll probably won't be able to see it) is the lower part of the periscope sight in the commanders cupola and yes I'm basing it on a submarine periscope just for the hell of it :o)


The aim is to actually get it to turn when I've somehow managed to fit it into the roof of the superstructure.


Wednesday, 29 November 2017

E-75 Tank Destroyer

The Hobbyboss tracks finally arrived the other day so I spent a few hours removing the links from the sprues and cleaning them up before fitting them to the model. This was trickier that normal as the axles are very short on the kit and the Paper Panzer Productions resin wheels are a loose fit as well as the sprockets and idlers so fun times all around. 
The Hobbyboss tracks are not that bad although purists might dismiss them but for my purposes (and substantially cheaper than Fruil, Spade Ace and Modelkasten) they will do.
The links are actually handed although no mention is made about this plus on every sprue there are two triangular parts of which I have absolutely no idea what they are for.
After cleaning up the links I glued a load together (one side at a time) and left them to set for about 30-40 minutes, the track was then wrapped around the drive sprocket and rear idler. There were a few more links needed to join the track and using super glue and in some cases wire to hold a couple of links together the right side was left to set while I proceeded to stick all the links together for the opposite side. Again after being left to set the process described above was repeated and left to set.


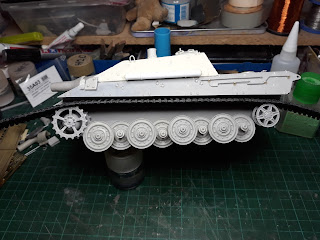


Looking at it now I may have set the height of the axles too low so the model is sitting a bit high but fuck it, it's a what-if so who cares? The wheels and tracks are now off the model and set aside as sub-assemblies which makes painting easier.
 To update a couple of other models I have on the go, the Hurricane needs the upper wing roundels spraying as I needed to cut the decals to get them to bed down around a raised detail on each wing. This will be done using masking film and in hindsight it would have been easier to have painted them in the first place; the Leopard needs the on-vehicle equipment painting before moving onto the weathering and the ZiL-131 needs spraying in the base colour.
Also I managed to cut my finger quite badly when removing some detail on the back of the E-75 while using a chisel blade;


 I was thinking at the time that I should really move my finger while cutting the part off but left it a micro-second too late and ended up running the blade up my finger. Idiot!
Don't try this at home kidz! 


Tuesday, 21 November 2017

E-75 'Eber' tank destroyer

Some more progress has been made on the model as I've added the kit-supplied etched grenade screens, tools and engine compartment cover. Also to add some interest to the engine deck I cut off the breather pipes that were moulded on and replaced them with styrene rod with the etch bits coming from the Voyager detail set, I also added a couple at the front of the deck.
One problem I had with the resin superstructure was that on one side there was quite a noticeable 'indent' on the edge and even trying to pack it out when gluing the superstructure to the hull didn't make much difference. Although it's a moulding fault I should have inspected the part better before I bought the conversion set as I could have swapped it there and then. Anyway looking at the model it was bugging me;


To hide it I came up with the idea of making a tube for the gun cleaning rods as found on Panthers and Jagdpanthers so I cut some 5mm diameter tube to a length of 58mm, made some end caps and added a handle either end from sheet brass bent to shape;

That hides the defect quite nicely! Here are some more progress shots, I'm waiting on the Hobbyboss King Tiger tracks to arrive so in the meantime I'm doing what I can to the model;


I've added grab handles to the engine bay doors and hatches on the superstructure, the brass tool clamps are from the kit as I couldn't face using the Voyager ones LOL. On my days off I'll make a start on the rear hull.

Friday, 17 November 2017

E-75 'Eber' tank destroyer

Some good progress has been made on this so far but rather boringly I have to stop as I'm working this weekend. The wheels are just fitted for show as the tracks will be glue onto them and when set the whole lot will be taken off as sub assemblies.
I masked off the engine deck and roof today and sprayed the interior black, which is something I really should have done BEFORE I glued the superstructure to the hull.


It's worth pointing out on the Trumpeter kit the slight sink mark either side of the rear hull that needs filling, I did this after filling all the location holes for the tools;


This is where I am so far;


I do like these 'what-ifs' as they give you freedom from historical accuracy which I need from time to time as I can get bogged down in research.