Recently Blogger announced changes to the way the blogs will work in the future. There is an option to try the 'new blogger' which I did but thought it was'nt very intuitive so reverted to the old layout.
Unfortunately the new layout will become standard after July of this year so it's time to move. Also after researching Blogger it appears your content is not your own and Blogger (or Google who own Blogger) can delete it without warning which I found unnerving, especially with nine years worth of content.
The new blog is on Wordpress so if you want to keep following me I'll be over here;
https://wordpress.com/view/andykingsmodelblog.wordpress.com
The new blog is live but I'm still finding my way around it, however the fact I am able to do so tells me it is a bit more 'user-friendly' than the new-look Blogger (to this old fart anyway) and after nine years it's overdue for a makeover.
Thursday, 11 June 2020
Monday, 8 June 2020
Trumpeter 1/35 SA-6 Gainful
I added some more details to the cabin bulkhead, the main part being a box with 43 buttons on the front. After making the basic shape from plastic sheet I drew vertical and horizontal lines on the front for the rows of buttons as these had to be straight, after which I drilled a series of 0.5mm holes through the front.

Using 0.5mm dia plastic rod cut to 3mm lengths, these were inserted into the holes to represent the buttons. When they were all in I carefully sanded the ends of the rods to make sure they all matched;

The box was then glued into place on the bulkhead and apart from a couple of other parts that need making, this area is pretty much complete.

Sunday, 7 June 2020
Italeri 1/72 Lockheed MC-130H Hercules
My son was visiting me the other day and I asked him if he could bring the rest of my built up models that were still in the loft at my ex-wifes' house.
I was mainly after an Airfix 1/72 Canberra that I converted many years ago and a couple of other models but in the box was an old Italeri 1/72 C-130E/H that I had converted to a MC-130H configuration about 10 years or so ago using a Flightpath conversion set.
I had completely forgotten about this build as it was one of those I lost interest in for various reasons, mainly due to dropping it after it was painted and breaking a wing off as I recall. I did glue the wing back on and repainted it but the join was still visible so it got put in a box in the loft and quietly forgotten about.
Looking at the model today I had actually put a lot of work into it originally such as offsetting the elevators and rudder, rescribing all the panel lines, fitting replacement resin engines as well as converting it an MC-130H with the funny nose.
I found most of the kit parts that would finish the model as these were bagged and put in the spares box shortly after shelving the project, what I can't find are the undercarriage doors as I might have thrown them away for some stupid reason. Anyway the shapes of the doors are pretty simple so I should be able to fabricate new ones.
I have just ordered a Wolfpak Decal sheet that features two MC-130H's and may get a resin wheel set as the Italeri ones are pretty bland. The colour scheme I originally chose was the three-tone 'European 1' as I was hoping to do an MC-130 that I saw at an airshow in the mid-90's that featured the well known 'Death Dealer' figure on horseback. Pretty stupid really as there was no decal sheet available and the only way would have been to hand paint it.
The new decal sheet features an aircraft in a two-tone grey and has some artwork on it so that works instead.
I know the first job will be to clean the model as it is filthy!
We'll see how it goes as I have other stuff on the go at the moment but it would be good to bring this one back from the dead as a few other shelf-queens didn't survive as I had to be ruthless when I was moving out.


Saturday, 6 June 2020
Trumpeter 1/35 SA-6 Gainful
After chopping the hull, extending it, filling it and sanding it I was going to just leave it all closed up and get on with the build however I had always fancied detailing the interior when I bought it originally.
I got the WWP book on the SA-6 a while back and it is useful but a lot of the cabin interior has been missed out so I was having to guess the basic layout until one of my modelling friends supplied me with a whole host of interior and exterior pictures. FANTASTIC!
No excuses now so hopefully I can make steady progress as the interior is pretty complicated and I'm making everything from scratch. As long as it's close enough I will be happy and to be honest I am really enjoying it too.

The length of the cabin is about 45mm (2 3/4") so it will give you an idea of the scale.
Friday, 5 June 2020
Airfix 1/48 Hawker Sea Fury
In an earlier post I said how after painting the model it showed up some flaws in the cowling that I missed after the primer coat such as a couple of pin holes and what I hope is just a run in the primer rather than a moulding defect. If it is a defect I'll swap the cowling as I have another kicking around the bench.
It also showed up that the gaps between the cowling and fuselage at the top and bottom were more prominent than I first thought so now the paint has had time to harden off I filled them with white superfine Milliput and smoothed out the putty with a cotton wool bud (Q-tip) and water, that way the paint was'nt damaged.
The pin holes were filled with superglue and along with the paint run on the cowling side, sanded out and the area polished with a ladies nail buffer.
When the Milliput has set I'll respray the model as I missed a couple of areas the first time around;

Wednesday, 3 June 2020
Trumpeter 1/35 SA-6 Gainful
In the previous post I was explaining how the lower chassis was too short by 6mm...not any longer.
The cuts were made front and back, cleaned up, strips of .040 thou styrene were glued into place then the front of the hull was joined to the rear.
I used more strips of styrene to strengthen the join on the inside and when set I will fill and sand the hull as my joinery skills are not that stellar.


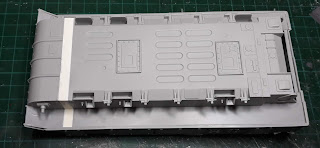

In the lower picture you can really see the difference the extension makes to the rear hull.
As for the swing arm locating pin I just sawed it off and will glue some plastic strip to the back of it to bring back the depth.
The cuts were made front and back, cleaned up, strips of .040 thou styrene were glued into place then the front of the hull was joined to the rear.
I used more strips of styrene to strengthen the join on the inside and when set I will fill and sand the hull as my joinery skills are not that stellar.


In the lower picture you can really see the difference the extension makes to the rear hull.
As for the swing arm locating pin I just sawed it off and will glue some plastic strip to the back of it to bring back the depth.
Trumpeter 1/35 SA-6 Gainful
To get the ball rolling on this I have to cut the lower hull in two places. The first cut is directly behind the three raised ribs at the front of the hull however one of the location points for a swing arm is here so I will make a mould of it out of Milliput.
When dry I'll melt some sprue from the kit and push it into the mould and hopefully it will reproduce the part. Failing that I will have to make a new one from scratch.


The other end of the lower needs 6mm removing and just goes to show how far out the Trumpeter kit really is here. From what I have read and seen so far this is the only real issue with the kit, I'm just hoping there are enough track links included to cover the extra distance.
Trumpeter SA-6 Gainful
One of the (dwindling number of) modelling groups I'm in on Facebook decided to have a group build with the theme of Anti Aircraft so I will be joining in with this;

I did have an idea to build it a few years ago but never got around to it so the group build was a good reason to dig it out of the stash.
I have a few aftermarket parts such as etch and wheels, I WAS going to use some Fruil metal tracks which I bought a few years ago but only found out yesterday that the tracks for a PT-76 were in the box instead. Whether this was due to a packaging error or some clown at a model show opening boxes and getting them mixed up (it happens) I'll never know.
After looking for any more extra bits I found out that a replacement lower hull is available as the Trumpeter one is 6mm too short. I won't be getting that but I will be hacking the kit hull so that should be fun.
The kit missiles need replacing as they are too long and too narrow, luckily I found a Cromwell Models SA-6 conversion set at a model show a couple of years ago so that takes care of them.
Airfix 1/48 Hawker Sea Fury
The model is now up to the painting stage and after a coat of primer the lower surfaces, fuselage, gear bay doors etc were sprayed with Mr Hobby Sky. I threw some Mr Hobby white into the jar as to me the Sky is too dark.
Spraying the Sky has shown up a couple of moulding defects that I missed so when the paint hardens off after a day or so I'll sort those areas out and respray.
 7
7
Spraying the Sky has shown up a couple of moulding defects that I missed so when the paint hardens off after a day or so I'll sort those areas out and respray.

Friday, 29 May 2020
Airfix 1/48 Hawker Sea Fury
Work is progressing pretty rapidly on the kit with no real issues apart from the fit of the outer wings as the gaps are pretty big but I'll deal with that tomorrow.
I was going to have the wings folded but although the detail is reasonable on the Airfix parts, they need some extra work and I don't have the time or inclination as I will get bogged down and it will kill the interest in the model.

The engine and spinner are from Barracuda Cast and the cowling is by Aerocraft in case you were wondering as the Airfix cowling has a couple of issues.
Tuesday, 26 May 2020
Airfix 1/48 Hawker Sea Fury
Yet another kit has found its way onto the bench as I'm keeping myself busy while I'm furloughed, this time it is the Airfix 1/48 Hawker Sea Fury and an aircraft I have been wanting to build for a long time.
There are other 1/48 Sea Furies available but they all have lots of issues so when Airfix released theirs a year or so ago I grabbed one and now seems a good time to start it.
So far I am just about to close up the fuselage. I used a Barracuda resin cockpit as the Airfix cockpit is OK but they missed out the gun sight and floor-mounted cockpit however as the cockpit colour is black, once the fuselage is joined together you won't see much of it anyway.


Wednesday, 20 May 2020
Hobbyboss 1/35 ZBD-05 Amphibious IFV
Construction of the hull is done so only the turret is left to put together and then the build is done. It has been relatively painless so far except for the etched headlight guards which were a complete pain in the arse to put together.


Apart from tow cables that's the hull built so I will get on with the turret shortly.

Looking at pictures of the real vehicle there is no easy way to do these as they are quite delicate, however the four horizontal bars on each light guard needed trimming until they fitted and were superglued into place after a lot of bad language. The shape and height of the guard makes the assembly very flimsy too with only one positive location point on the side of the hull so gluing the other side to the top of the hull is a bit hit and miss;


Hopefully they won't look that bad under a coat of paint. While finishing up the hull I decided to replace a couple of the moulded on grab handles with ones made from copper wire and glued them at an angle rather than flat;


Monday, 18 May 2020
Bronco 1/35 CV3/33 Tankette
I recently purchased a Miniart set of Italian tank crew as I have an idea for a diorama at some point so for the past couple of evenings I've been assembling and painting one of the figures. The Miniart set is pretty good although there was a bit of flash and some heavy seam lines to remove first but after clean up and under a coat of Games Workshop Chaos Black it looked pretty good. Before it was undercoated I drilled a hole in the figures' mouth and added some sprue to represent a cigarette.
It's been a while since I painted a 1/35 figure but I quite enjoyed it, the figure also gives the tankette some scale and shows just how small it was. The figure was painted with Vallejo acrylics throughout, I used to use oil paints for flesh areas but tend to use acrylics more nowadays.


It's been a while since I painted a 1/35 figure but I quite enjoyed it, the figure also gives the tankette some scale and shows just how small it was. The figure was painted with Vallejo acrylics throughout, I used to use oil paints for flesh areas but tend to use acrylics more nowadays.


Saturday, 16 May 2020
Bronco 1/35 CV3/33 Tankette finished
I managed to finish the model last night but I have an idea for a small diorama so that explains the unpainted figure, anyway that was a lovely little kit and it went together very well. My only gripe was that the wrong clear sprue was included so I had to drop some watchmakers cement into the headlights to represent lenses but that's about it.
The amount of detail included for such a small model is pretty impressive and just needed some extra bits for the interior making from scratch. The fit of parts was really good including the tracks as being link and length they can go very wrong sometimes and you have to try and 'stretch' them to get them to join up.
Altogether an impressive little model and I really enjoyed building it.


Thursday, 14 May 2020
Airfix 1/48 Tiger Moth finished
Well after the self inflicted problems I had the model is finally finished. That was a very enjoyable build and a really good kit. Some aspects have been simplified such as the cockpit, the rudder control bar that protrudes through the cockpit sides etc but it really is a good base for extra detailing.
I chose a different scheme to that provided in the kit and the models represents Tiger Moth 85873 'T-2' of Belgisch Militaire Vliegwezen/Aviation Militaire Belge based at Goetsenhoven, Belgium during the 1950's. Decals came from a Hannants Xtradecals sheet X48207 de Havilland Tiger Moth Pt3 Overseas Operators.


I chose a different scheme to that provided in the kit and the models represents Tiger Moth 85873 'T-2' of Belgisch Militaire Vliegwezen/Aviation Militaire Belge based at Goetsenhoven, Belgium during the 1950's. Decals came from a Hannants Xtradecals sheet X48207 de Havilland Tiger Moth Pt3 Overseas Operators.


Tuesday, 12 May 2020
Hobbyboss 1/35 ZBD-05 Amphibious IFV
Work is progressing quite nicely with the hull having the last bits fitted before assembling the turret.
The hydraulically operated bow is a pretty good fit but if you are going to display the model with it opened you need to fill all the mould-pin marks on the inside faces. If (like me) you are going to keep it closed then don't bother with all the cylinders as you won't see them and it will save a few hours construction time.
I'll glue the lower bow plate to the hull as the four pins that secure it are tiny and will not stand any stress putting on them, however to aid painting the upper plate will be left moveable.


Sunday, 10 May 2020
Hobbyboss 1/35 ZBD-05 amphibious IFV
I made a start on this about three or four years ago and although it has two very pretty camo schemes, I soon lost interest due to the amount of track links it required and it got shoved back into the stash.
I was recently having a sort out of what kits to dispose of and this was due to go either on Ebay or to landfill but after seeing those camo schemes and having time on my hands I decided to build it.
The biggest job is the track links and these took the best part of two evenings to remove them from the sprues, trim the sprue attachment points, glue the guide horns on each link before eventually joining them all together.
They went together fairly well but I would advise that you glue a length long enough for the lower runs to wrap around the front drive sprockets and rear idlers first as the upper run will be hidden by the side skirts and you will need to 'stretch out' the upper run to get it to join up with the other links.

I didn't glue the wheels to the axles as I want to be able to remove the wheels and tracks as sub-assemblies to aid painting later on.
I'm hoping to build this straight OOTB as I haven't got a clue about these vehicles, the only thing I know is it looks pretty.
Saturday, 9 May 2020
Bronco 1/35 CV3/33 Tankette
Using an airbrush rather than a rattle can, I undercoated the model with Tamiya XF-1 black then sprayed the base coat with XF-59 desert yellow.
Using Vallejo 70892/087 yellow olive and a paint brush I applied the camouflage pattern with the intention of giving the model a highly thinned overspray to tone down the
yellow olive and make it look as though it was sprayed on....that's the plan anyway.

Using Vallejo 70892/087 yellow olive and a paint brush I applied the camouflage pattern with the intention of giving the model a highly thinned overspray to tone down the

Wednesday, 6 May 2020
Bronco 1/35 CV3/33 Tankette
The model is built and ready for painting. I'll be giving it an undercoat of Tamiya XF-1 Matt Black rather than the usual Games Workshop Chaos Black as I'll be able to get into hard-to-reach areas better with an airbrush plus the rattle can will just blow the model all over the place.
The black undercoat will help with the tracks as painting them in place on the model instead of as sub assemblies is going to be tricky.

The black undercoat will help with the tracks as painting them in place on the model instead of as sub assemblies is going to be tricky.

Tuesday, 5 May 2020
Bronco 1/35 CV3/33 Tankette
That's enough for the interior so the upper hull will be fitted next then with the addition of a few more bits the model will be ready for painting.
I had thought about making the missing ammo boxes but enough is enough and time to get it done. I based the interior colours on a set of Lifecolour paints for Axis tank interiors and it's good enough for me.


 The ruler gives you an idea of just how small the model is ( with imperial measurements shown for those that haven't got a clue about the metric system lol).
Edit; Dammit! I couldn't leave the empty ammo racks so made some from scratch just to fill up the spaces;


I had thought about making the missing ammo boxes but enough is enough and time to get it done. I based the interior colours on a set of Lifecolour paints for Axis tank interiors and it's good enough for me.


Edit; Dammit! I couldn't leave the empty ammo racks so made some from scratch just to fill up the spaces;


Subscribe to:
Posts (Atom)