I picked up these 200mm heads from Mitches Military Models at the Crewe model show (22nd Feb) for a fiver as I thought they would be ideal for practising face painting without buggering up an expensive figure;
I also picked up this;
When I get a bit of time I shall have a play with them as they seem to look better than the Andrea Flesh set (the figure on the front of the Andrea packet seems a funny colour LOL).
The heads are quite nicely moulded and for £5 I can class them as a bargain. I do have a 120mm British Para by Mitches Military Models but the head was'nt brilliant so I got in touch and got 4 replacements for £5 which were much better and will make my figure look a bit different. MMM do some nice stuff and can be found here;
Mitches Military Models
The clamp the heads are in was also purchased at the show from Sphere Products. I actually bought it for a long term project which is a Poste Militaire 90mm mounted French Hussar as the kit is white metal and the horse alone will need a sturdy holder as it is quite heavy. The clamp itself is rather good and goes together easily enough, I just needed to file the location holes for the nuts as they are VERY tight. I bought the taller clamp as it includes the shorter one so I can interchange them to suit. Sphere Products can be found here;
Sphere Products
By the way I got the paint from Steve K Miniatures and he's a great guy to deal with;
Steve K Miniatures
Anyway back to the SS-23 :o)
Hi and welcome to my small corner of the internet and here you will find a variety of models that mainly comprises armour, aircraft and figures. I'll be adding pics of current projects and older stuff plus models that have appeared in a couple of magazines, Model Military International and Military Miniatures in Review. Thank you for stopping by and taking an interest in my work.
Thursday, 26 February 2015
Figure painting practice
Panzer, Tank, Aircraft,
200mm heads,
Mitches Military Models,
Scale 75,
Sphere Products,
Steve K Miniatures
Sunday, 8 February 2015
SS-23 etchy bits....ZzzzzzZZZZZzzzz
It's taken a fair few hours to get to this point and I still have the lower part of this door to do then it all starts again for the right-hand side...ho hum.
Panzer, Tank, Aircraft,
Miniman SS-23 Spider,
SS-23,
SS-23 etch,
SS-23 Spider
Wednesday, 4 February 2015
After all the excitement of finishing the T-90....
It's back to the SS-23...yippee.....
At the moment I'm adding all the etch bits but it's around 3am (UK time) and my eyes are starting to hurt so I think that's enough for now.
The Hold n Fold has been invaluable for this job as it would have been very difficult to get accurate bends in the etch metal otherwise.
Once all the etch has been fitted the model should be ready for painting so YAY! :o)
The Hold n Fold has been invaluable for this job as it would have been very difficult to get accurate bends in the etch metal otherwise.
Once all the etch has been fitted the model should be ready for painting so YAY! :o)
Panzer, Tank, Aircraft,
Miniman SS-23 Spider,
SS-23,
SS-23 etch,
SS-23 Oka,
SS-23 Spider
Tuesday, 3 February 2015
Wednesday, 7 January 2015
Albatros DIII update
Wow two updates in one day!
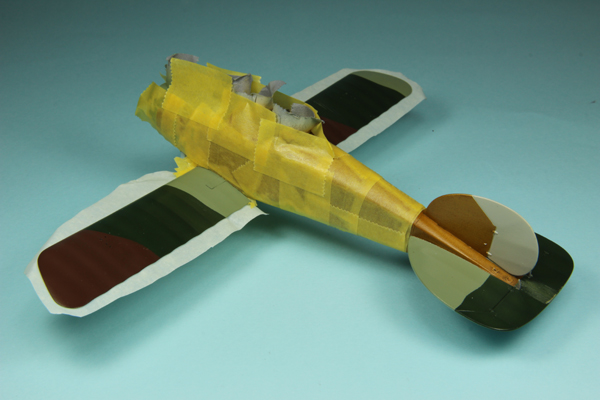
Anyway I received the decal sheet for the Albatros so I've masked off the model (again);
It's also given me an opportunity to fix a couple of areas that were a bit rough after the first go at painting and only showed up at the finishing stage;
The tailplane issue was caused by spraying Tamiya acrylic at too low a pressure making it look as though it had been sprayed with textured paint, the upper wing had a flaw in the primer coat that I had missed.
The colour scheme will be Werner Voss's machine (the bottom one) although it was just coincidental (honest) that an Eduard Albatros D.Va arrived the other day that would just happen to fit the colour scheme at the top;
Funny that? ;o)
Anyway I received the decal sheet for the Albatros so I've masked off the model (again);
It's also given me an opportunity to fix a couple of areas that were a bit rough after the first go at painting and only showed up at the finishing stage;
The tailplane issue was caused by spraying Tamiya acrylic at too low a pressure making it look as though it had been sprayed with textured paint, the upper wing had a flaw in the primer coat that I had missed.
The colour scheme will be Werner Voss's machine (the bottom one) although it was just coincidental (honest) that an Eduard Albatros D.Va arrived the other day that would just happen to fit the colour scheme at the top;
Funny that? ;o)
Panzer, Tank, Aircraft,
Albatross DIII,
Eduard Albatross DIII
T-90; Fixed it!
YAY! I managed to blend the re-sprayed area into the model;
It looks much better compared to how it looked originally;
So the bad news for my wife is that it won't be thrown out anytime soon. Ha! :o)
It looks much better compared to how it looked originally;
So the bad news for my wife is that it won't be thrown out anytime soon. Ha! :o)
Tuesday, 6 January 2015
Meng T-90; First post for 2015
Here we go with 2015 and I wish you all a Happy New Year.
Well...it WAS nearly finished but the issue with the colour on the right front fender was bothering me too much sooooo here's how it looked;
Even after trying to hide it with the weathering it only seemed to make it worse so bugger it I resprayed the area;
NOW it looks worse :o) This is actually the original sand colour that I mixed so it's a good example of how colours change during the weathering process and why I'm not that hung up on getting the EXACT shade of paint, near enough works for me.
I shall re-apply all the pigments, washes etc until it blends in again with the rest of the hull however I'll avoid the oil paints this time as that is what caused the problem in the first place. The oil paint dotting technique can be very effective but as I have learnt you need to choose the colours wisely, especially over light coloured areas such as this.
I'll post some pictures up later on as this bit gets attention, unless of course it all goes horribly wrong in which case you can look for it on the nearest landfill site :o)
Well...it WAS nearly finished but the issue with the colour on the right front fender was bothering me too much sooooo here's how it looked;
Even after trying to hide it with the weathering it only seemed to make it worse so bugger it I resprayed the area;
NOW it looks worse :o) This is actually the original sand colour that I mixed so it's a good example of how colours change during the weathering process and why I'm not that hung up on getting the EXACT shade of paint, near enough works for me.
I shall re-apply all the pigments, washes etc until it blends in again with the rest of the hull however I'll avoid the oil paints this time as that is what caused the problem in the first place. The oil paint dotting technique can be very effective but as I have learnt you need to choose the colours wisely, especially over light coloured areas such as this.
I'll post some pictures up later on as this bit gets attention, unless of course it all goes horribly wrong in which case you can look for it on the nearest landfill site :o)
Subscribe to:
Posts (Atom)