Showing posts with label 1/35 T-90. Show all posts

Wednesday, 7 January 2015

T-90; Fixed it!

YAY! I managed to blend the re-sprayed area into the model;

It looks much better compared to how it looked originally;

So the bad news for my wife is that it won't be thrown out anytime soon. Ha! :o)

Wednesday, 31 December 2014

Meng T-90- Close but no cigar for 2014

Well I NEARLY got something finished for 2014 lol! At least the T-90 now has the tracks on and just needs a few things doing here and there and then I can call it done;


I hope that the photo's I've posted have been of help to others building the Meng T-90, obviously there are other modelsout there that are WAAAAAY better than mine but I'm quite pleased with it. The ONLY thing I'm not happy about is the right fender colour where I changed the tone with oil paint, I was hoping the weathering would either lighten it or hide but it did'nt.  Never mind!
I'm not planning on anything for 2015 really, I just tend to pick stuff that catches my eye and probably why I have a loft full of kits :o)
I have a new decal sheet for the Albatros and the SS-23 build is almost complete so there's at least two definites for the new year, anyway Happy New Year to everybody that has looked in on my blog and see you in 2015

Monday, 29 December 2014

Meng T-90-Starting the weathering

The oil paint process worked in a fashion but I was'nt entirely happy as the white spirit was dragging off the acrylic matt varnish plus I've altered the sand colour too much in places, anyway it's onto the pigments and to begin with I've given the whole model a dusty look with Mig's 'Dry Mud';


In the bottom two pictures I've tried to show the contrast between areas that have had pigment applied.
I have to say that at the moment I'm quite pleased with the way it's looking as instead of flooding an area with white spirit I've just been using a damp flat brush to drag the pigment in vertical and horizontal directions, previous results have just ended up as a mess plus the IPA I used to use for this job made the pigment dry funny too.
Next job will be to use different colours of Mig pigment and various AK muddy colours to add to the weathering effect, also I may try depicting wet mud on this model too.
So far so good!
PS; I forgot to say that the paint chipping was done with various Vallejo acrylics before the pigments were applied. Sorry about that :o)


Saturday, 27 December 2014

Meng T-90-Back to it

After the decal issue with the Eduard Albatros I've decided to rescue the T-90 from the Shelf-of-Doom instead. I got as far as the intial wash of dark brown and matt varnishing but that's where the build stalled earlier this year so after seeing the beautiful T-90 by Abilio Grajera it gave me an incentive to finish this one. To be fair it's not THAT far from the finishing post, it's just the dotting with oil paint that will take a while to dry however that is the main reason the oils are put onto cardboard instead of a palette as it soaks up the linseed oil in the paint and that helps it dry quicker.


I use a variety of colours but tend to avoid white as in my experience all it's ever done is leave a chalky finish and some browns can be a bugger to blend in too.
By the way the Maltesers are there for moral support as at the time of writing it's cold and raining outside so it's a perfect day for some modelling with home comforts :o)

Monday, 11 August 2014

Meng T-90; The weathering starts here

Here we go with everyones favourite part of modeling, the weathering (well it's my favourite bit anyway).
Initially I've applied a pin wash of Mig Productions Dark Brown wash into all the recesses and streaked some down the vertical surfaces, after which when it's dry the model will get a couple of coats of matt varnish then I can start on applying chipping, mud, dust etc.
I like the dark wash as it does make the detail stand out more.


Wednesday, 28 May 2014

Meng T-90 update 28/5/14

The build is now finished and last night I washed the model in warm water and washing up liquid (Fairy Liquid so that my hands stay soft lol) so it is now left to dry. When it is I can get some primer on it to start the painting process.


The build is quite an involved one even straight out of the box but to me the level of detail is very good. As with every kit there are areas you can improve and extra detail you could add but I'm quite happy with the kit as is. The only extra details I've added are mainly rivets here and there (where the fuel tank brackets sit and some on the ERA tiles on the front of the turret plus headlight cables on the hull front).


Monday, 5 May 2014

Meng T-90 Update 5/5/14


YAY! I've finally made a start on the turret and it almost feels it has the same amount of parts as the hull (i.e LOTS). Anyway it's going together well, the only thing extra thing I've done is for the co-axial MG as the fit is quite sloppy. I drilled a hole in one side of some scrap 20 thou styrene sheet big enough for the gun to poke through and using some copper wire wrapped around a 0.6mm drill bit made the rubber 'o' ring seal that goes around the barrel. Yeah I know you can hardly see it but I know it's there :o)


Most of the sensors will be buttoned up except for a couple just for added interest;

The barrel....be careful putting it together as the fit is sloppy where the two halves join in the middle and can result in a wonky barrel. I'm not sure about using the kit one or swapping it for a metal one but at the time of writing the RB Model item is out of stock everywhere and I can only get one from Hong Kong via Hobby Easy (Orange Hobby item number G35-121). I'll have to think about it.


Saturday, 3 May 2014

Meng T-90 update 3/5/14

I fixed the side skirts to the hull last night and I don't know whether it was me but the fit was'nt the best and I've been left with quite a large gap on the right side. Also there are gaps between the front mudguards and where they join the skirts;


Bugger! To fill the gaps I'll run a thin bead of Milliput into them and smooth it out with water, that way I won't destroy any surface detail which would happen using model filler. The skirts are securely fixed using liquid glue at first then cyano so the joints should'nt open up and crack the Milliput.
Other than that the fit of parts has been very good so far, MAYBE I'll get to make a start on the turret this weekend as the hull has felt never ending. Still I'm getting my monies worth with this kit :o)

Edit: D'OH!! Forget what I said about filling the gap along the top of the side skirts where it joins the hull, I've just looked at photo's of the real thing via a walkaround on Prime portal and there IS a gap. Luckily I checked before filling them in :o)
By the way here's a photo from Primeportal that shows the gap.

Wednesday, 30 April 2014

Meng T-90 update

I got a fair bit done last night on the T-90 although I could'nt decide on whether to mount the rear fuel tanks later on. That decision was made for me when cleaning up the four brackets that fit on the rear hull as I broke one;


In the instructions Meng show that you just cut off the bracket if you don't want the fuel tanks mounted however it's not that straightforward as you need to add some bolt heads in the corners of the square plate. Oddly Meng have represented these bolts as raised lines so these need to be removed top and bottom then bolt heads added from styrene sheet using a hexagonal punch and die set;


The headlights were a bit fiddly to put together and the guards would probably look better made from wire but I used the kit ones;


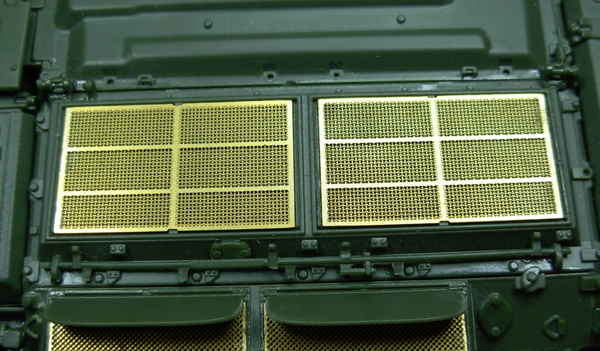
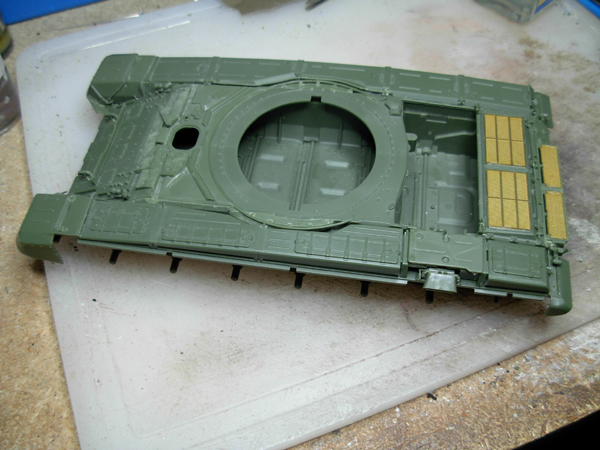
One thing to note (which I did'nt first time around) is the orientation of the etch screens on the rear engine deck. If you look carefully the spacing is slightly wider on the top row , something which I got wrong on the right screen but managed to lift and re-glue it last night;


That's it for now, hopefully I'll get some more done over the weekend as there is a public holiday here in the UK on monday.

Tuesday, 29 April 2014

So where was I regarding the Meng T-90?

Ahhhhh yes aaaaaaaand we're back! :o)
The T-90 build stalled sometime in November when I lost my modelling mojo so I gave the hobby a rest and did other stuff for awhile (mainly playing guitar).
Anyway after seeing some great stuff on my other modelling friends Facebook pages, slooooowly the fingers have started itching to stick plastic bits together again and the first job is to pick up where I left off with the T-90;


So the upper hull has been glued on and just for this there are an amazing amount of parts, fortunately the fit is good although some of them are VERY tricky to clean up without breaking them specifically the fuel lines, front mud guard springs etc. Take note about the small lights on the rear hull (parts C41,C49 on the left, C40,C50 on the right) as the placement for the left ones in the instructions is wrong, they attach to the rear hull and not the fender as shown;


Well it's good to be back at the bench and hopefully I'll make some progress on this kit.

Wednesday, 13 November 2013

Meng 1/35 T-90

I made a start on the model last week and so far so good, the fit of parts up to this point has been very good
although I can't help think the torsion bars won't stand up to much stress due to the fairly soft plastic;


The tracks are next to put together and apparently they are a REAL chore to assemble according to some who have built the model so we'll see how it goes.