Saturday, 23 June 2018

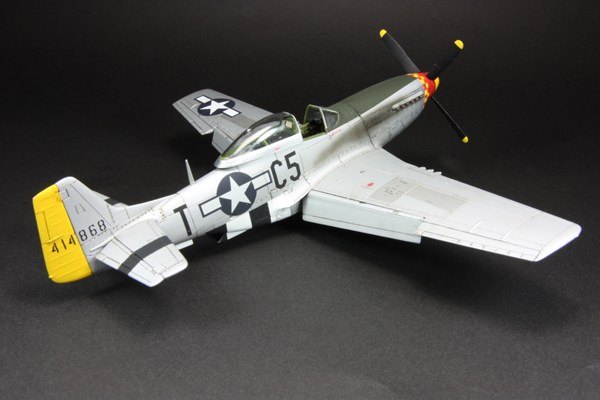
Airfix 1/48 P-51D Mustang finished

Finally! I didn't think I would finish this one after all the issues I've had (mostly of my own making) so I'm pleased to see it done and it breaks my track record of USAAF subjects which haven't made it to the end. 
So here then is P-51D 44-14868 'Hurry Home Honey' from the 364th Fighter Squadron, 357th Fighter Group flown by Major Richard A 'Pete' Peterson;


Monday, 18 June 2018

Airfix 1/48 P-51D Mustang

I was having a look at another modellers P-51 the other day (that Spencer Pollard chap) and the way he had picked out different panels using the base colour and another colour and although I have already applied the decals I wanted to do this on my model.
The decals needed masking so I coated them with Winsor and Newton masking fluid and when dry put Tamiya masking tape over them. The AS-12 that I used as the basecoat was decanted into a jar and when it had degassed I mixed in some XF-1 black and sprayed the wing gun panels and around the exhausts.


Mostly the masking fluid worked at protecting the decals when removing the tape however the red lettering on the nose suffered a bit;


The solution was to paint in the red by hand using Andrea basic red, a fine paint brush and hoping it matched the decal. I think it worked;


All I need to do is apply the national insignia on the wings as the Microscale decal sheet arrived today and the grey on the stars and bars seems to match that on the EagleCals sheet.
It's not going to be perfect by any means but I'm glad that the finishing line is in sight, particularly as it would have just been sitting in the Box-of-Shame plus I've learned a couple of new things too which is always a bonus.


Wednesday, 13 June 2018

Airfix 1/48 P-51D Mustang

After all the issues I had with the model during painting I'm pleased to say that it is now up to the decalling stage as over the past few days I've been masking and painting, followed tonight with a coat of Alclad Aqua gloss;


If I was to do this scheme again I would leave the exhaust stacks off as they made masking tricky for the red and yellow chequers around the nose.
I was very dubious about the handling properties of the Tamiya AS-12 spray paint but I had no issues with paint lifting of the model and it seems to be fairly tough stuff so it bodes well for future natural metal finishes.
Considering that this was a basket-case a few weeks ago and consigned to the Box-of-Shame I'm pleased that I've actually got it this far, with a bit of luck I might actually finish it.

Edit; I had two decals left to place on the model when this happened;


The decal just broke into pieces after I got it out of the water! What's more annoying is that although I have replacement decals in stock, NONE are the grey type of insignia as depicted on the aircraft I wish to build.
The decals I'm using are from an EagleCals set and they are one of the best aftermarket decal companies out there so I'm very surprised this has happened, anyway I've found a Microscale Mustang insignia and stencil decal sheet that features the grey stars and bars so I'll have to wait for this to arrive. Bugger!
Stupid bloody hobby.....

Sunday, 10 June 2018

Airfix 1/48 P-51D Mustang and Heller Mirage IV

Having calmed down a bit from the last time I touched this model I decided to give it one more shot so I resprayed the wheel bays then masked them off along with the cockpit.
Instead of using Alclad I decided to use a Tamiya rattle-can (AS-12) as recommended by one of my model-making buddies , this being applied directly to the bare plastic.
There were STILL some issues with the styrene looking rough in a couple of places on the fuselage sides however I gave the model three coats and it's more or less evened out and will do for my purposes;


I have to say the AS-12 looks pretty good! The next test would be with masking tape as this model will require the olive drab anti-glare panel, yellow band around the nose, a yellow tail and black invasion stripes masking off.
With that the first area was the anti-glare panel and where everything started going wrong last time so using Tamiya tape the nose was masked off and sprayed with Tamiya XF-62. The tape was carefully removed as I was concerned about the silver paint coming away but there was no need as the AS-12 seems to be pretty tough stuff;


This bodes well as I may actually finish the bloody thing! The cockpit still needs touching up due to the Mr Muscle oven cleaner getting in but after looking the other day it's not THAT bad and repairable.
While I was in the loft I decide to get some paint on the Heller Mirage IV;


I used Tamiya X-27 for the base coat however it was very warm in the loft and the paint was drying out before it hit the model so I've been left with a rough surface that will need going over with Scotchbrite before applying the green for the camouflage scheme.

Monday, 4 June 2018

ICM 1/35 ZiL-131

After gloss costing the model with Alclad Aqua Gloss I masked off the front bumper and grill ready for the yellow and blue. I mixed Mr Hobby H-25 Sky Blue and H-11 Flat White until I got a near-as-dammit match with the decals, keeping the paint in jars as I may have to paint over the Cyrillic lettering on the bonnet;


After applying the decals I'll start the weathering although apart from spraying the base coat I haven't touched the rear cargo bed as I need to have a think about how to simulate worn wood.

Monday, 21 May 2018

ICM 1/35 ZiL-131

This is another one I started last year but got bored with. I had actually primed it but it got shelved however I was thinking about this model the past week so I got it out to see what I could do with it.
Although the markings I have in mind for it are pretty specific (Ukraine 2015 or thereabouts) I want to make it look abandoned and rusty so I sprayed the model with Tamiya XF-9 Hull Red then mixed in their matt orange and resprayed random areas;


When dry I decanted the cheapo hair spray I use for chipping purposes from the can into a spare jar and sprayed the cab, bonnet and roof using an old Badger 200 that I had renovated and brought back into service. Using hairspray straight from the can just floods a model and you end up removing large areas of paint when chipping so an airbrush gives you greater control.
The model was sprayed using a mix of Tamiya XF-58 and yellow;


I then left it for an hour or so then using a stiff brush (the cheap nylon ones you find in the art section of a bargain book shop) the model was held under hot running water and the paint scrubbed off. I actually removed a big section on one side so had to spray it with hairspray again and repaint it. I'm quite happy with the results so far and when the cab is masked off I'll repeat the process for the rest of the chassis;


The markings I'm planning feature yellow and blue stripes on the front grill and ends of the front bumper however it's going to be very tricky matching the shades on the decal sheet so this may just be an overall green vehicle.

Thursday, 17 May 2018

Heller 1/72 Mirage IV

After the wings warped a few weeks ago when trying to get the starboard wing down to match the port one I shelved the project and cleared the bench, however after a few days I ordered another kit via Ebay. When it arrived I once again rescribed the wings and to counter the starboard wing issue (which surprisingly is still there on the newer kit) I put a thin strip of Evergreen plastic sheet into the wing root, filling and sanding later on.
In fact the kit needed a fair amount of filling especially around the air intakes, forward fuselage, nosecone and the underside where the wing assembly joins up with the fuselage;


With all the joints cleaned up I sprayed the cockpit interior black, repainted the two Martin Baker ejection seats I had found in the spares box then gave both cockpit and seats a dry brush with Vallejo medium sea grey. The canopies and windscreen were masked off with Tamiya tape and glued into place with GS Hypo cement which is used by watchmakers and jewellers and very useful for model transparancies as unlike superglue it doesn't attack clear plastic.
When dry the gaps around the canopies will be filled with PVA glue (after I've washed it down) then it will get a coat or two of primer as I feel it's still a bit rough in areas I've filled.